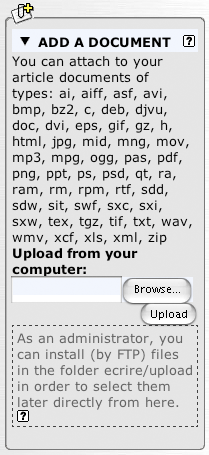
 The installation of files on the server is done by using the "Attach document" interface for the articles and “Publish a document in this section” for the sections.
The SPIP interface allows you to integrate multimedia files on your site (sound, video, text,...).
Editors can attach documents to articles. These documents can be located either at the end of the text (a bit like “attachments”), or inside the text as a preview vignette (or thumbnail).
Site administrators can also install documents directly into the sections of the sites.
You should note the important difference between those two methods: in articles, documents are “attachments” which are useless without the article to which they are associated (in the site navigation, you can view these files from the articles); when they are installed directly in the sections, these documents become elements of the site like the articles and news items, and not just an informational supplement any more.
Step 1: Installing the documents on the server
 The installation of files on the server is done by using the "Attach document" interface for the articles and “Publish a document in this section” for the sections.
Notice that, for the articles, this interface appears in two different locations: at the bottom of each article’s page and on the left (under the images) when you modify an article. Those two interfaces have exactly the same functions, and you can use either of them according to your needs. As for the sections, the installation of documents is done on the page for the section in question.
Before you install your files, you have to create them on your computer. The document upload interface reminds you of the list of formats supported by the system. You should make sure that you name your files with the correct extension (for instance, “xxxxxx.mp3” for an MP3 file.)
The interface is the same as the one for the images: the button labelled “File” or “Browse” (depending on your browser) opens a dialogue window allowing you to select the file on your hard drive. Once you have selected the file, click on “Upload” to send a copy of it to the server. Warning: this operation may take a lot of time, depending on the size of the file. You should also note that depending on your server host settings, large files might be rejected; in this case you can bypass this limitation by installing your files via FTP.
Step 2: Information details and thumbnails
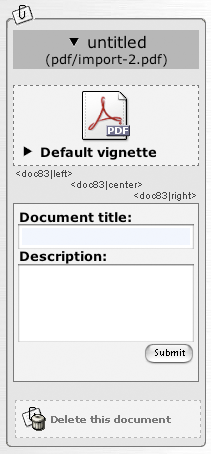
 Once the file has been transferred to the server, an information panel is displayed. Several operations can be performed using this panel.
- Preview thumbnail
This concept is very important: unlike images which can be inserted directly into the text, documents do not appear on the corresponding page straight away. A preview thumbnail is displayed to the visitor, who can click on it should he need the corresponding document.
The top part of the information box allows you to choose the preview thumbnail. You can accept the default thumbnail or install a customised logo.
The default thumbnail is installed automatically by the system, depending on the document format. The advantage of accepting this thumbnail is that the symbols for documents of the same type will be consistent across the whole site.
If you prefer, you can install a logo (preferably small and of the format GIF, JPG or PNG) which will appear instead of the default thumbnail. Once this logo is installed, a “Delete the customised thumbnail” link allows you to go back to the default thumbnail if necessary.
- In the article modification page, the “shortcuts” allowing you to insert a document in the text are identical to those for the images.
- The bottom part enables you to enter a title and a description for your document. There is no need here to enter the format or the size of the multimedia file, as this information will be automatically provided by the publishing system.
- Finally, the “Delete this document” button is used to delete any unnecessary files. You should note that it is essential to delete any unwanted documents, otherwise they will still display on the public site.
- Concerning the documents installed in the sections, you can also modify the publication date of the document (according to the same principle for modification of articles and news). Once these settings have been submitted, any section documents are immediately available on the public site (there is no need to validate them like there is for articles and news).
Step 3: Inserting documents into the text for articles
Concerning the documents associated with articles, you can simply install them and enter the information (steps 1 and 2 above). When you publish the article, these documents will appear at the end of the text as a list of attached documents.
However, you can also decide to insert the preview thumbnails inside the text. This will then insert images that the site visitor can click on that are inserted inside the article’s text.
The procedure here is exactly the same as the one for the images, the only difference is that the thumbnails will be elements that you can click. Insert a shortcut like <imgxx|yy> or <docxx|yy> whether you want to display the thumbnail alone or with its associated title and description.
You should note that any documents that you install inside the text will not appear underneath the article text any more. For articles, there are two locations where the documents will display: either inside the text (thumbnails that you can click on), or at the end of the article under the reference to “Attached documents”.
Special cases: Video and sound documents
Some multimedia files are meant to be displayed directly on a web page (e.g. a video clip inserted directly into the article).
To be able to insert such a document inside the text as an embedded multimedia animation and not just as a clickable thumbnail, you need to enter its dimensions: width and height strictly greater than zero (for sound files you choose the width you wish to attribute to the play cursor and a minimal height such as 25 pixels).
You should note that the boxes allowing you to enter the dimensions will only appear for the documents of certain formats supported by SPIP for their integration in the articles (namely: avi, quicktime, real, flash).
Once you have entered these dimensions, an additional SPIP shortcut will be provided, in the shape of <embxx|yy> (being a shortened form of “embed”).
If you are already familiar with this sort of integration, you will be happy to know that you can add additional parameters such as:
<emb54|center|autostart=true|quality=high>